스프링 설정
스프링 프레임워크를 사용하기 위해서는 스프링 프레임워크 라이브러리를 받아서 설치해야 한다. 제일 간단한 방법으로는 STS를 설치해서 사용하는 방법이 있다. 또 다른 방법으로는 이클립스를 이용해서 하는 방법이 있다. 이클립스를 이용하는 방법은 help -> eclipse marketplace에서 spring ide를 받고 스프링 프레임워크 라이브러리 파일을 추가시키는 방법이 있다. STS를 이용해서 하는 방법은 maven 빌드 툴을 이용해서 하는 방법과 그냥 하는 방법이 있다. maven을 이용하게 되면 스프링 프레임워크에 필요하거나 프로젝트 진행에 있어서 필요한 라이브러리들을 쉽고 간편하게 관리할 수 있다. maven을 사용하지 않는 경우에는 스프링 프레임워크 라이브러리 파일을 모두 내려받아서 추가해주면 된다. maven을 사용하지 않고 하는 경우에는 직접 라이브러리 파일을 찾아서 추가해줘야 한다는 번거로운점이 있다.
maven을 사용하지 않는 경우
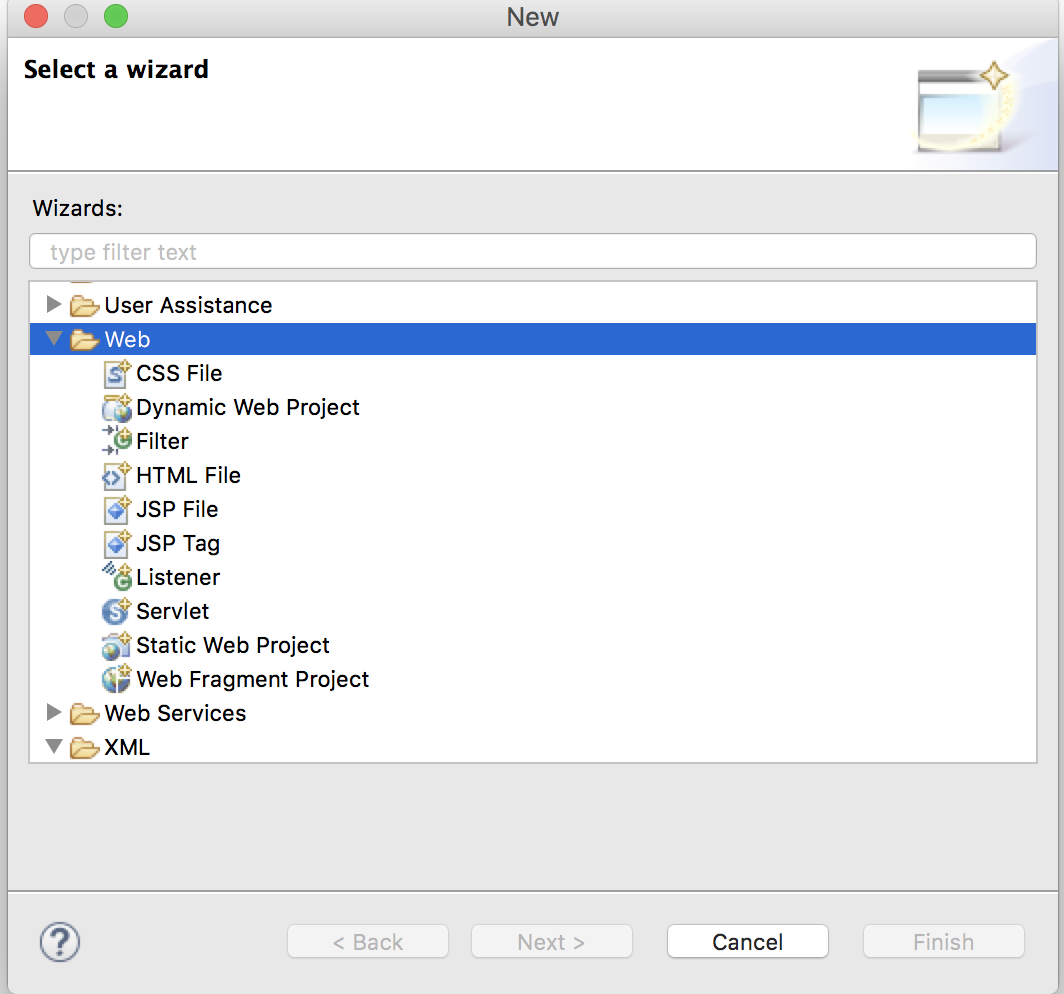
- maven을 사용하지 않는 경우에는 STS를 기준으로 Package Explorer에서 오른쪽 마우스를 누른 후 new -> others에서 web 폴더에 있는 Dynamic Web Project를 생성한다.
- 생성하게 되면 아무것도 없는 Dynamic Web Project가 생성이 된다.
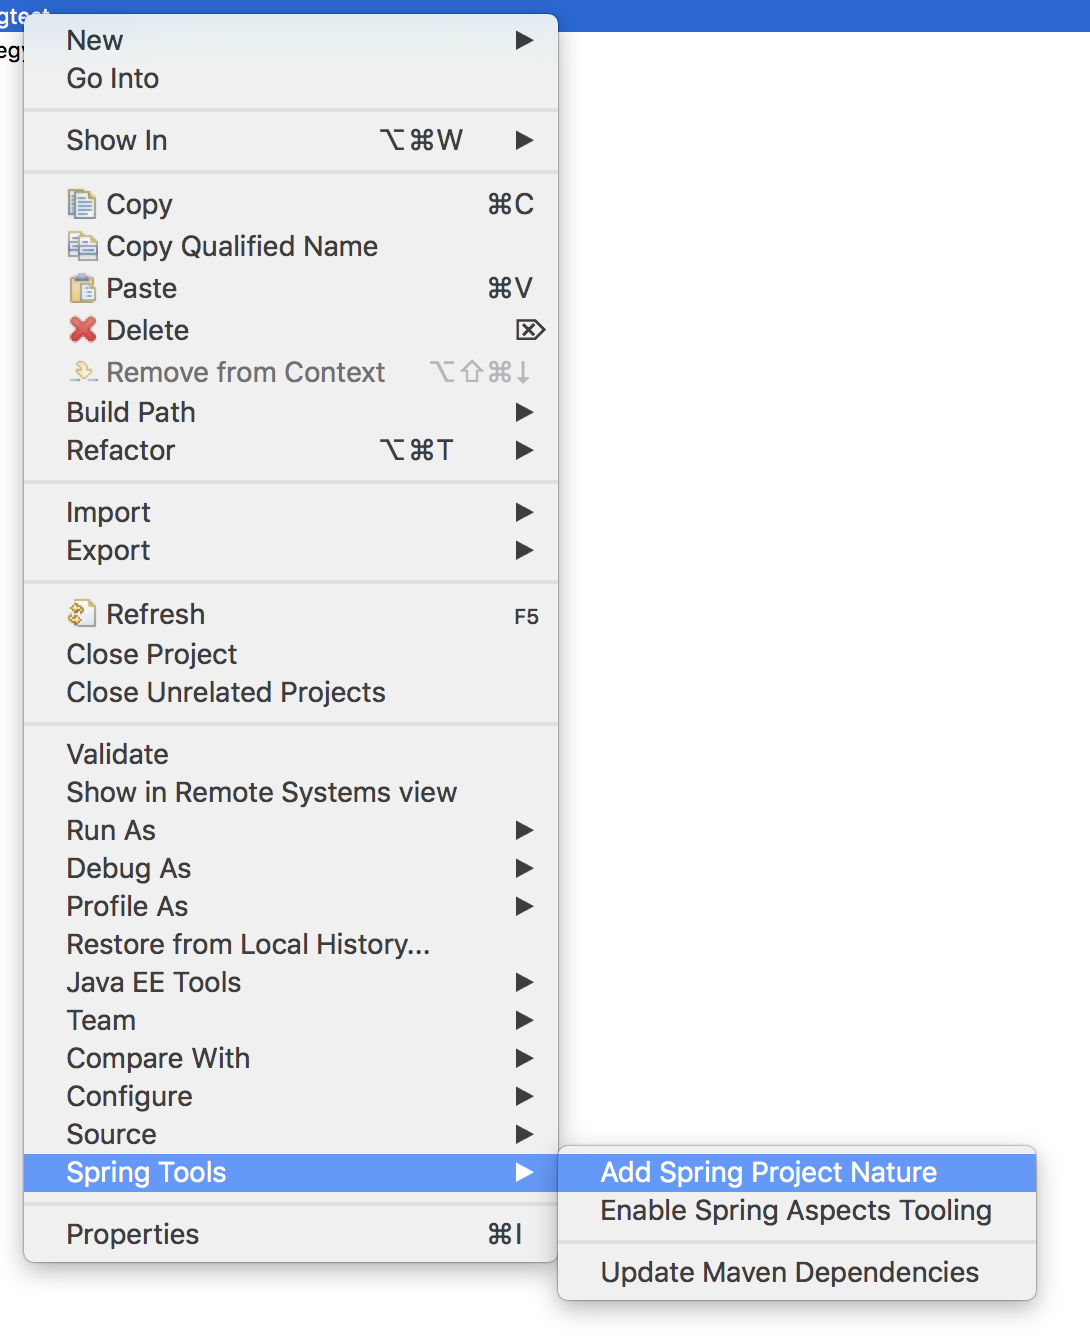
- 위 그림과 같이 add spring project nature를 해준다. 그러면 스프링 프로젝트로 변하고 프로젝트 폴더 그림 옆에 S가 생긴것을 볼 수 있다.
그 다음 남은 것은 Spring Framework 추가, web.xml, servlet-context, application-context(root-context)를 생성해주고 view(jsp파일)와 Controller 자바 파일을 생성해주기가 남았다.
- 먼저 Spring Framework를 추가해보자. http://maven.springframework.org/release/org/springframework/spring/ 왼쪽의 링크에서 원하는 스프링 프레임워크 버전을 선택해서 라이브러리 파일을 다운로드 받는다.(최신버전일 경우 현재 자신의 컴퓨터에 깔린 JAVA버전을 확인해봐야 한다.) 다운 받은 후 아래 경로와 같은 곳에 받은 라이브러리 파일을 추가한다. 또한 추가로 commons-logging.jar(누르면 다운로드 됩니다.) 파일을 받아서 넣어줘야 한다. commons-logging.jar 가 없을 경우 tomcat 에러가 난다.
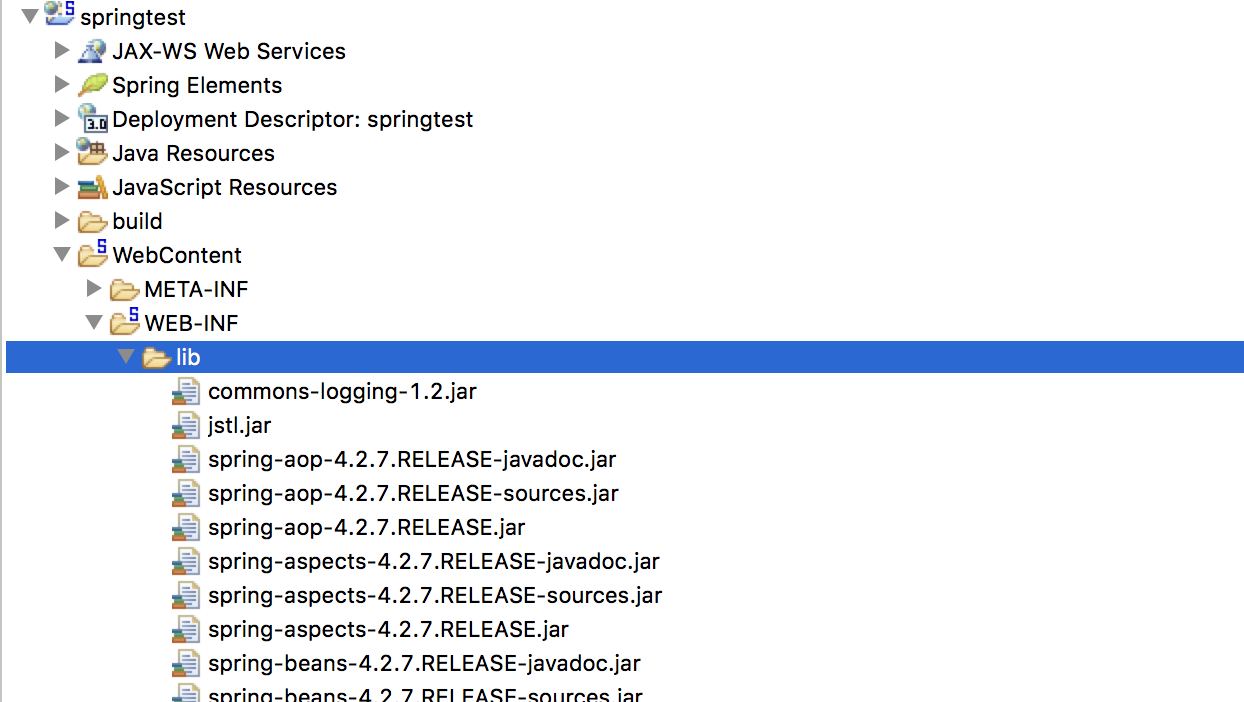
- 위 그림과 같이 Spring Framework 라이브러리를 추가하고, 다음으로 web.xml을 만들어 준다. WebContent -> WEB-INF 폴더 안에 만들어 준다. web.xml을 추가하고 나서 아래 코드를 복사 붙여넣기 해서 넣어준다.
<?xml version="1.0" encoding="UTF-8"?>
<web-app xmlns:xsi="http://www.w3.org/2001/XMLSchema-instance"
xmlns="http://java.sun.com/xml/ns/javaee"
xsi:schemaLocation="http://java.sun.com/xml/ns/javaee http://java.sun.com/xml/ns/javaee/web-app_3_0.xsd"
id="your_id" version="3.0">

  <display-name>your_display_name</display-name>


	<context-param>
		<param-name>contextConfigLocation</param-name>
		<param-value>/WEB-INF/root-context.xml</param-value>
	</context-param>

	<listener>
		<listener-class>org.springframework.web.context.ContextLoaderListener</listener-class>
	</listener>

	<servlet>
		<servlet-name>pji</servlet-name>
		<servlet-class>org.springframework.web.servlet.DispatcherServlet</servlet-class>
		<init-param>
			<param-name>contextConfigLocation</param-name>
			<param-value>/WEB-INF/pji-servlet.xml</param-value>
		</init-param>
		<load-on-startup>1</load-on-startup>
	</servlet>


<servlet-mapping>

    <servlet-name>pji</servlet-name>

    <url-pattern>/</url-pattern>

</servlet-mapping>


    <welcome-file-list>
    <welcome-file>index.jsp</welcome-file>
  	</welcome-file-list>

</web-app>- 위 web.xml 코드에서 신경써줘야 할 부분이 있다.
맨 위에 id = your_id 는 web_app의 id를 넣는 부분이므로 아무거나 넣고싶은 것을 넣어준다. 다음으로 <display-name> 부분은 DD파일의 title정도 이다. 보통 프로젝트 이름이 들어가게 되며 수정가능하다. (톰캣에서 DD파일은 web.xml 로 웹 어플리캐이션의 환경설정을 담당한다.) 다음으로 <context-param>은 <param-name>, <param-value>를 입력해줘서 application context의 설정파일의 경로를 입력해준다. 다음으로 <servlet-name>은 디스패쳐서블릿의 이름을 입력해주면 된다.(하고싶은 이름을 아무거나 넣으면 된다.) 그리고나서 <init-param>을 이용해서 <param-name>과 <param-value>를 입력해줘서 servlet context의 설정파일 경로를 입력해준다.(보통은 servletName-servlet)으로 xml이 설정된다.
<servlet-mapping> 부분은 <servlet-name>을 위에 <servlet>에서 설정했던 이름과 동일하게 설정해주고 <url-pattern>을 설정해준다. <welcome-file>은 첫 화면에 노출될 뷰 파일을 적어준다. 위에서는 index.jsp로 설정했다.
- 이제 servlet-context와 root-context를 설정해보자. servlet-context와 root-context을 xml로 작성할 것이다.
<?xml version="1.0" encoding="UTF-8"?>

<beans xmlns="http://www.springframework.org/schema/beans"
	   xmlns:mvc="http://www.springframework.org/schema/mvc"
  	   xmlns:xsi="http://www.w3.org/2001/XMLSchema-instance"
  	   xmlns:context="http://www.springframework.org/schema/context"
	   xsi:schemaLocation="http://www.springframework.org/schema/mvc http://www.springframework.org/schema/mvc/spring-mvc.xsd
		http://www.springframework.org/schema/beans http://www.springframework.org/schema/beans/spring-beans.xsd
		http://www.springframework.org/schema/context http://www.springframework.org/schema/context/spring-context.xsd">

  	<mvc:annotation-driven />


	<bean id="annotationMapper" class="org.springframework.web.servlet.mvc.annotation.DefaultAnnotationHandlerMapping">

		<property name="order" value="0" />

	</bean>


	<bean id="viewResolver"

		class="org.springframework.web.servlet.view.UrlBasedViewResolver">

		<property name="viewClass" value="org.springframework.web.servlet.view.JstlView" />

		<property name="prefix" value="/WEB-INF/viewFolder/" />

		<property name="suffix" value=".jsp" />

	</bean>

	<context:component-scan base-package="com.test" />


</beans> viewResolver 설정에서 <property name=”prefix” value=”/WEB-INF/viewFolder/” /> 는 앞 경로를 의미한다. 디스패쳐 서블릿이 컨트롤러로 부터 결과값을 받아서 viewResolver로 연결해 줄 때 /WEB-INF/veiwFolder/로 경로가 이동되고 <property name=”suffix” value=”.jsp” /> 를 통해 확장자가 .jsp로 끝나는 뷰 파일을 호출할 것이라고 property설정을 해주는 것이다. 위에서 viewFolder와 .jsp는 자신이 원하는 것으로 해도 된다. 위 예제 에서는 jstlView를 사용했으므로 추가로 jstl.jar(누르면 다운로드 됩니다.)를 받아서 lib폴더에 넣어줘야 한다. 또한 <context:component-scan base-package=”com.test” /> 에서 base-package 경로를 자신의 프로젝트 패키지에서 controller.java파일이 있는 패키지 경로로 입력해주면 된다. 만약 component-scan을 사용하지 않을 경우 따로 bean을 등록해주고 DI를 해줘야 한다. 그렇지 않고 @autowired를 사용할 것이라면 <context:component-scan base-package=”com.test” />에서 경로를 알맞게 바꿔주자. 현재 예제에서는 component-scan을 사용했다.
<?xml version="1.0" encoding="UTF-8"?>
<beans xmlns="http://www.springframework.org/schema/beans"
	   xmlns:mvc="http://www.springframework.org/schema/mvc"
  	   xmlns:xsi="http://www.w3.org/2001/XMLSchema-instance"
  	   xmlns:context="http://www.springframework.org/schema/context"
	   xsi:schemaLocation="
	   	http://www.springframework.org/schema/mvc 		http://www.springframework.org/schema/mvc/spring-mvc.xsd
		http://www.springframework.org/schema/beans		http://www.springframework.org/schema/beans/spring-beans.xsd
		http://www.springframework.org/schema/context  	http://www.springframework.org/schema/context/spring-context.xsd">


  	<mvc:annotation-driven />


</beans>root-context에는 위와같이 기본적인 것만 해주면 된다.
- 이제 다음으로 view파일을 만들어줄 차례다. view파일은 두가지를 만들것이다. 하나는 index.jsp와 helloSpring.jsp를 만들것이다. 아까 web.xml에서 welcome-file로 index.jsp를 지정하였으므로 index.jsp가 기본 페이지가 될 것이고 index.jsp에서 helloSpring에 링크를 걸어주어 helloSpring이 화면에 출력되도록 해볼것이다.
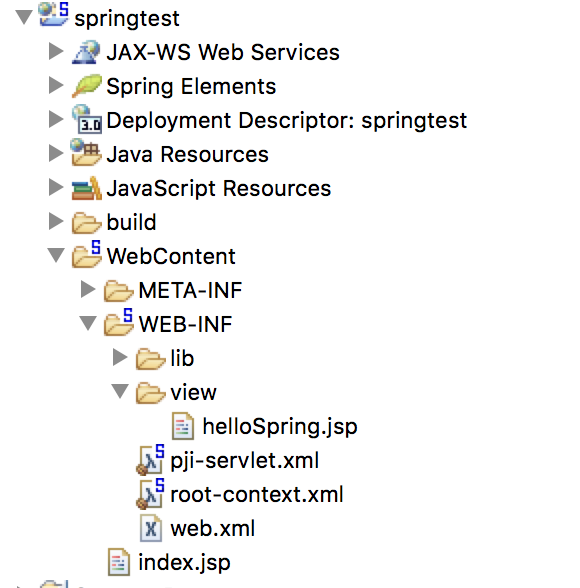
- 위와 같이 추가해 주고 index.jsp와 helloSpring.jsp를 아래 코드와 같이 작성한다.
<%@ page language="java" contentType="text/html; charset=UTF-8"
    pageEncoding="UTF-8"%>
<!DOCTYPE html PUBLIC "-//W3C//DTD HTML 4.01 Transitional//EN" "http://www.w3.org/TR/html4/loose.dtd">
<html>
<head>
<meta http-equiv="Content-Type" content="text/html; charset=UTF-8">
<title>TestProject - Hello Spring World</title>
</head>
<body>
<a href="helloSpring">Enter Spring World</a>
</body>
</html><%@ page language="java" contentType="text/html; charset=UTF-8"
pageEncoding="UTF-8"%>
<!DOCTYPE html PUBLIC "-//W3C//DTD HTML 4.01 Transitional//EN" "http://www.w3.org/TR/html4/loose.dtd">
<html>
<head>
<meta http-equiv="Content-Type" content="text/html; charset=UTF-8">
<title>TestProject - Hello Spring World</title>
</head>
<body>
${helloWorld}
</body>
</html>- 마지막으로 컨트롤러를 추가할 차례다.
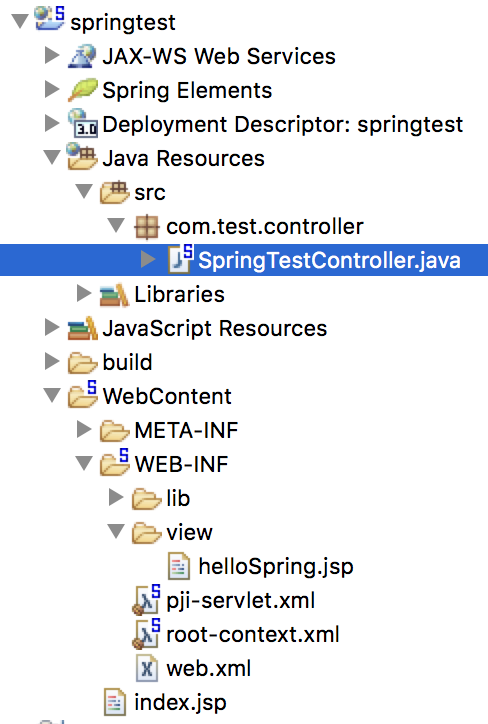
- com.test.controller 패키지를 추가하고 SpringTestController.java를 추가했다.
package com.test.controller;

import org.springframework.stereotype.Controller;
import org.springframework.web.bind.annotation.RequestMapping;
import org.springframework.web.servlet.ModelAndView;

@Controller
public class SpringTestController {
	@RequestMapping("/helloSpring")
	public ModelAndView TestController(){
		ModelAndView mv = new ModelAndView();

		mv.addObject("helloWorld", "hello~ Spring World");
		mv.setViewName("helloSpring");
		return mv;
	}
}- 컨트롤러를 추가해서 index.jsp에서 helloSpring으로 링크가 걸려서 넘어오게 되면 디스패쳐서블릿에서 핸들러매핑을 통해 TestController()로 넘어오게 된다. 비지니스 로직을 TestController()에서 수행하고 mv.addObject를 통해 메시지를 담고, setViewName를 통해 view 값을 넘겨준다. 그러면 아래 그림과 같이 실행이 된다.
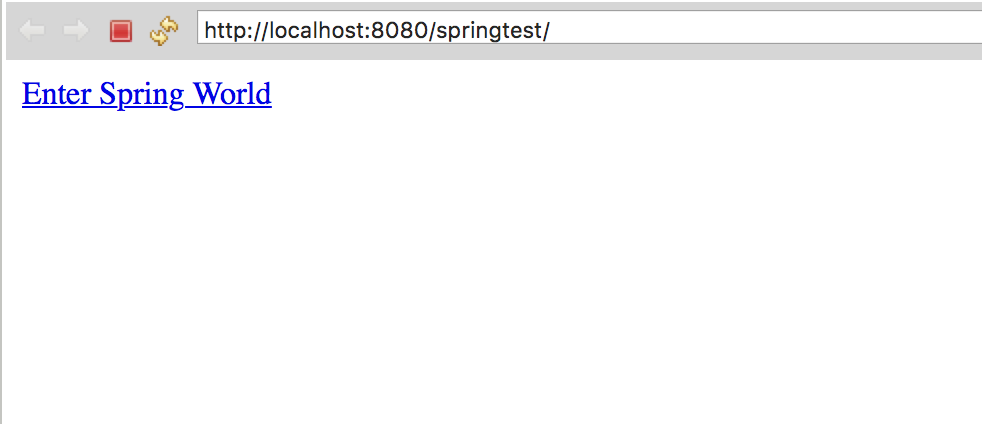
- index.jsp 를 출력한 화면. 위 링크를 누르면 아래 그림과 같이 된다.
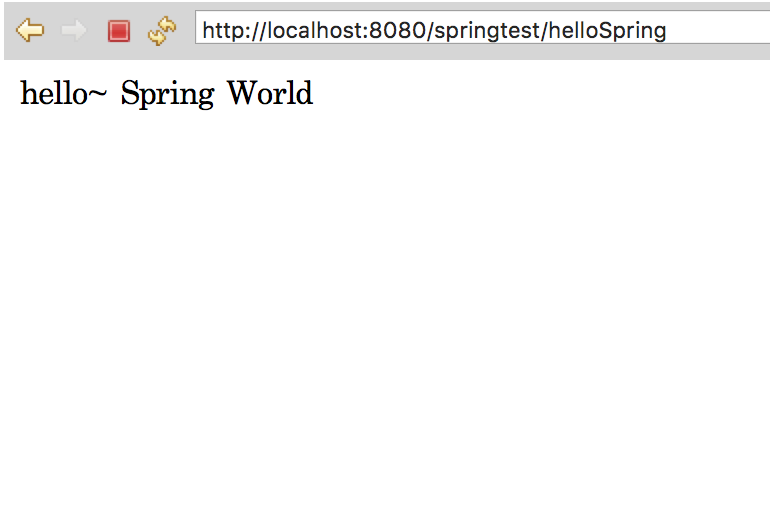
- helloSpring.jsp 를 출력한 화면.